Technology Pursuit

Blending Technology Into the Language Arts Classroom

Page 4 of 22

Create Your Own Media Bias Chart


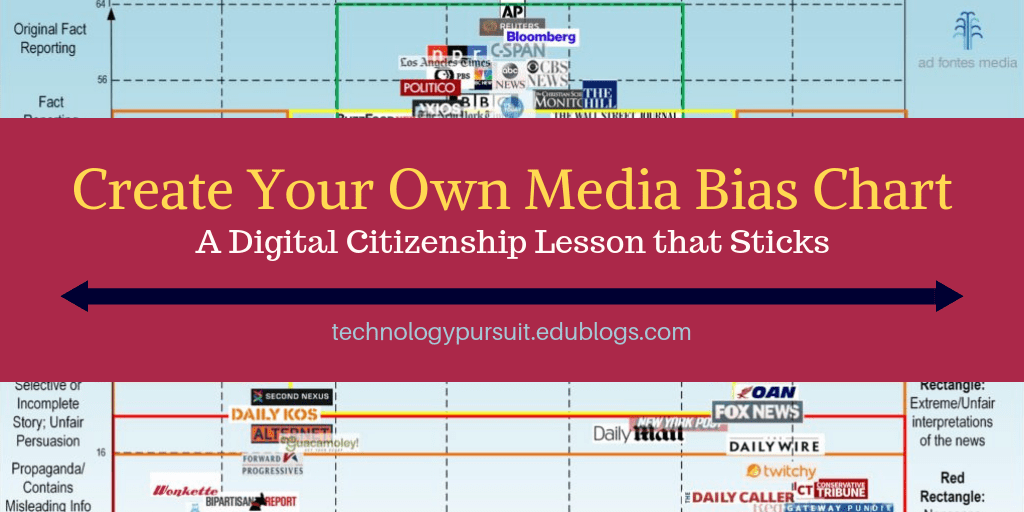
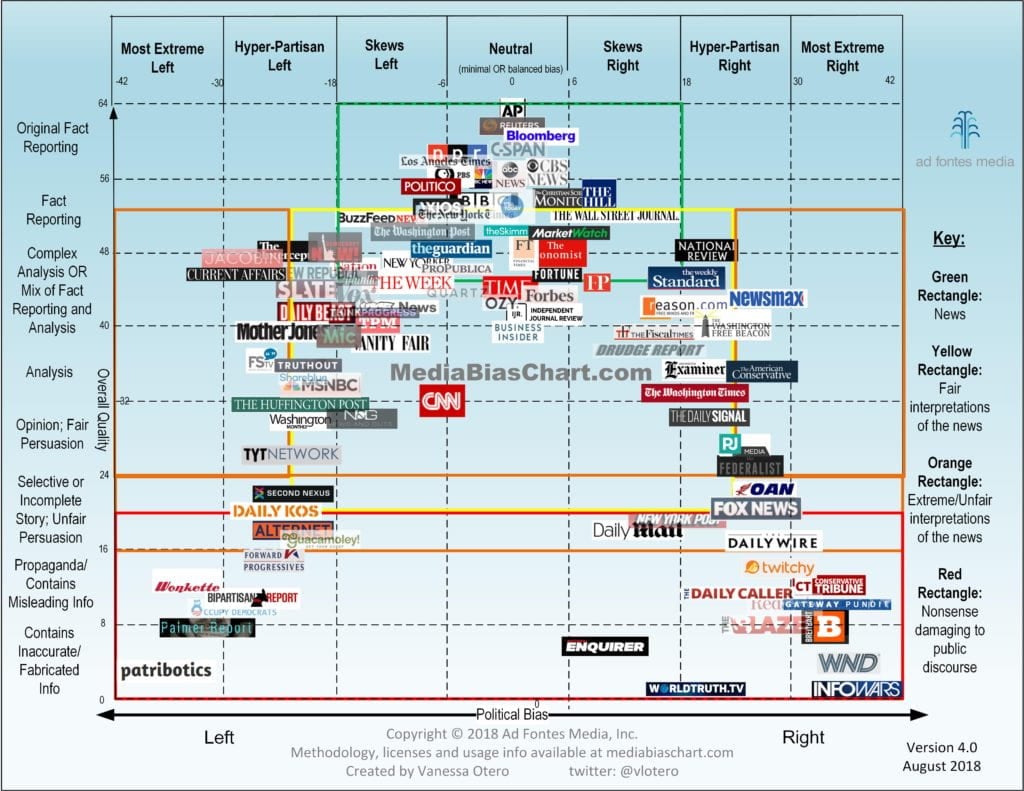
Chances are, you’ve seen this media bias chart (or similar ones) on your social media.

https://www.adfontesmedia.com/

During my fake & biased news analysis unit, I wanted to incorporate this chart. I could have just had students study and analyze it, but I didn’t know how long-lasting the experience would stay with them.

Instead, I decided students could make their own charts.

Using markers and butcher paper, I drew an XY axis. I also added a section on the side for sources that didn’t have a place on the chart (such as satire like The Onion).

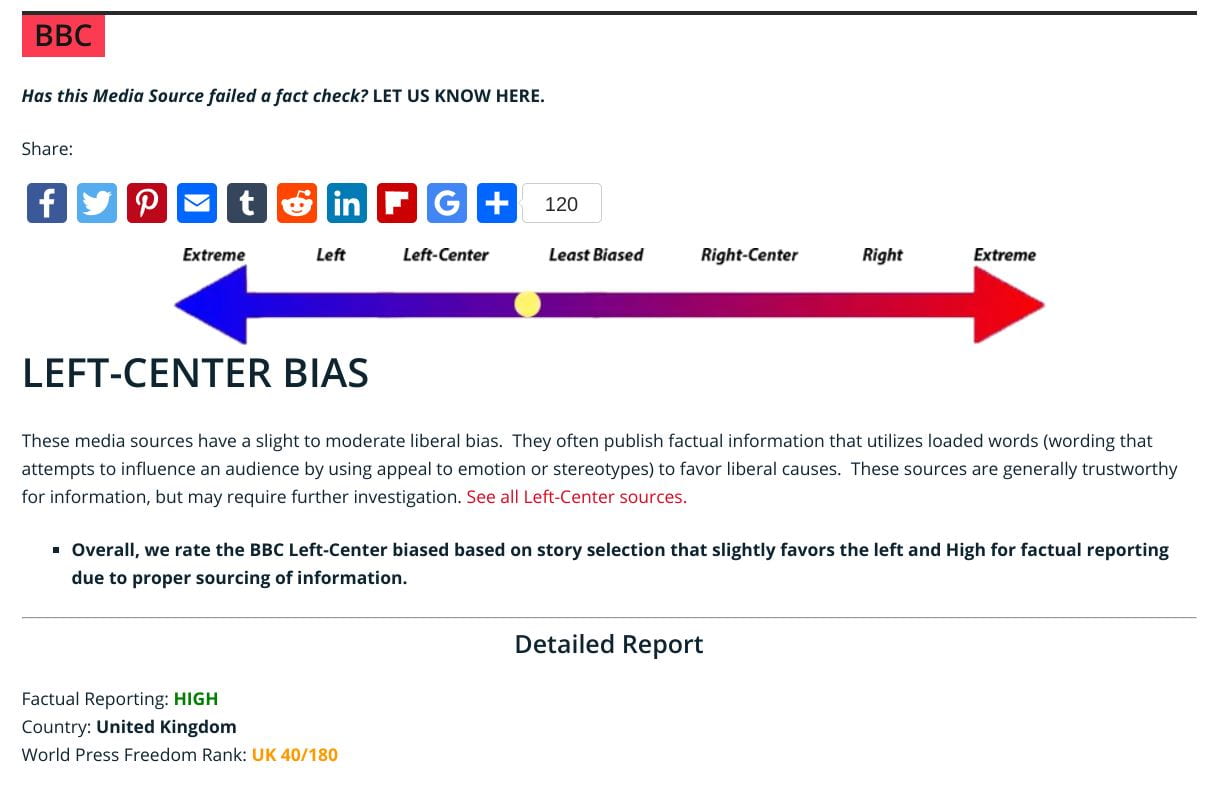
When class time came, I first modeled how to search for sources on mediabiasfactcheck.com, where students could then see how sources were rated. (See the BBC results below). Then I showed them how the chart worked–left/liberal sources on the left, right/conservative sources on the right, as well as the level of factual reporting.

At that point, the students started looking up their own sources. I asked students to find at least five sources–and they needed to move quickly because if their source was already on the paper, they had to find another one.

I also encouraged students to check sources that they see on social media, and to Snapchat and YouTube they went. Of course, many searched mainstream sources or sources their parents used.

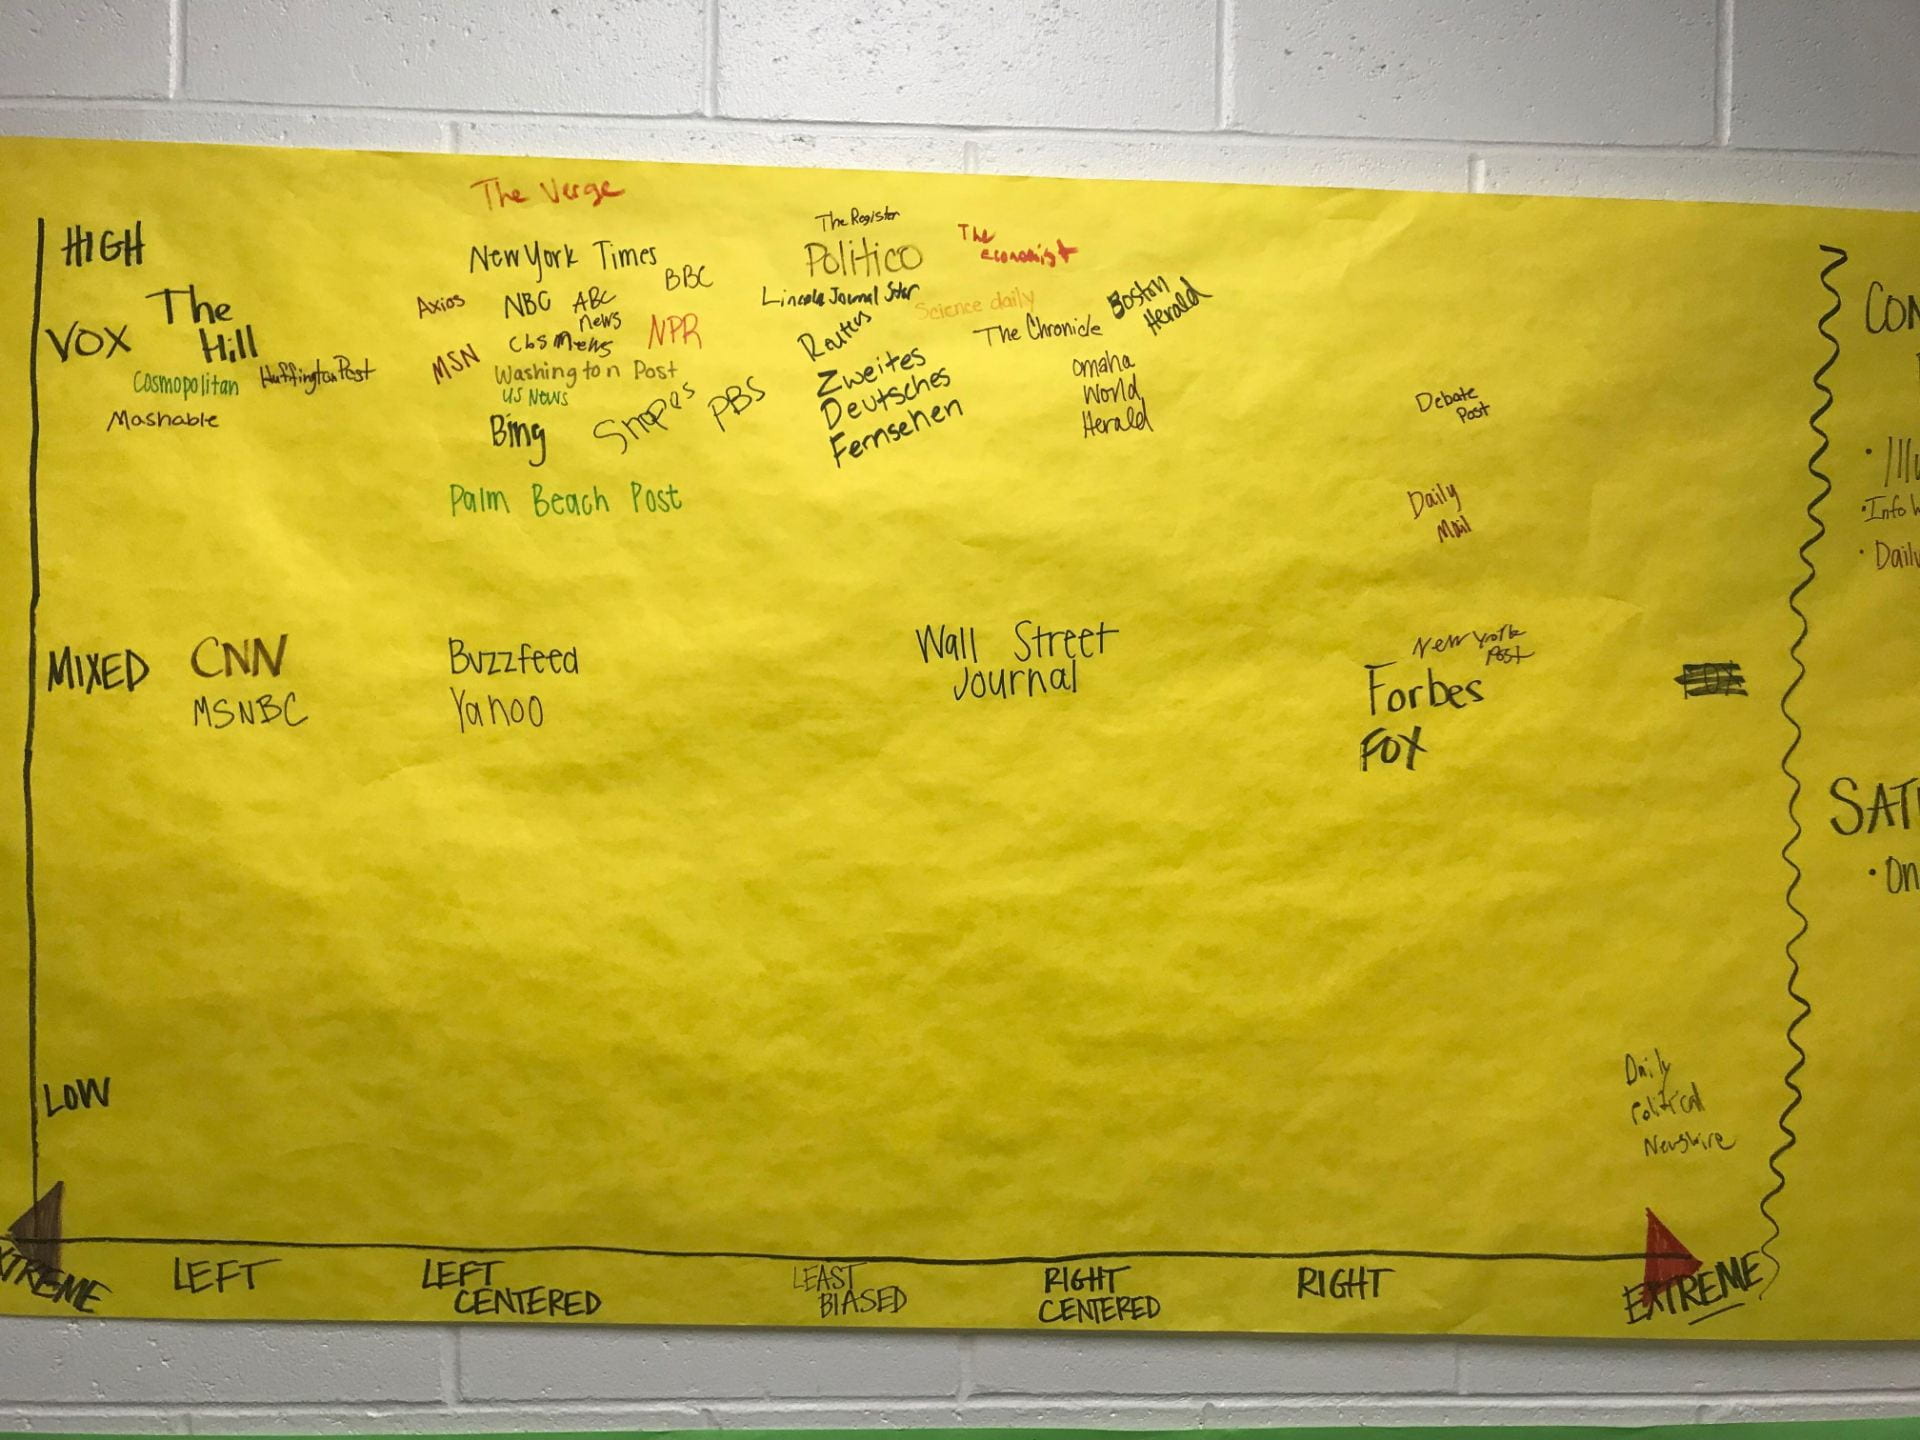
What did they find from this? Our mainstream media tends to the political left. However, we live in a conservative rural county, so many also realized that many sources they see on their social media feeds tend to the right side of the political spectrum.

We ended with discussing how every form of reporting has some bias. Any news passed on is slightly skewed through the reporter’s perspective, but as the chart shows, some sources choose language and stories that lean left or right politically. We also talked about how this chart doesn’t indicate which sources are right or wrong, good or bad–except for the extreme ends of the spectrum, which are downright fake news and faulty reporting–but that the goal is to be balanced in our research and reading. If you use a source that leans right, then also peruse a source that leans left.

Another great source (if your school doesn’t block Facebook like mine does) is Wall Street Journal’s Blue Feed/Red Feed. It’s a great comparison of what our social media feeds can look like if we program them to see only left-leaning or only right-leaning sources. This encourages discussion on how this can affect American’s understanding of both sides of issues, as well as the effects it could have on our society if we refuse to listen to those who think and believe differently from us.

Lessons and resources like these are essential to make our students critical thinkers about the media they consume and their responsibility to society. The media bias continuum activity, in particular, was one that students commented said had a major impact on how they viewed the media.

Any other resources you love using to encourage critical thinking about media consumption? Share them below!

Audio Book Upgrade: Recording Children’s Books

When I was a kid, I spent hours at the town library listening to books with cassettes. I wanted to read each one, though I can’t remember whether I reached that goal.

Fast forward thirty years, and my students have re-created a similar experience for our elementary students. Here’s how we did it.

Step One: My theater/speech students visited our elementary school library and selected 2-3 books. This short field trip was one of my favorite days of class. Students gasped in delight as they found books they’d forgotten about–just as if they’d found a long lost friend.

Step Two: Practice and record. I first modeled reading a few books, talking about enunciation, pausing, and changing voice. Some students chose to do the project alone, but others worked together, serving as different voices for each other’s books.

I let them choose whichever recording device they wanted. Most simply used their phones. If you wanted to take it a step further, you could use Audacity and edit the final product, even adding special effects and music.

The most difficult part of the project was collecting the recordings. Because students used many different platforms, I received the recordings via email, text message, or AirDrop. Keeping them organized was a challenge. I eventually uploaded them all to a Google folder.

Step Three: Upload to Anchor. Originally, I’d planned to keep the recordings in a Google folder that was available via the QR code, but to play the recording required a few more clicks to open up Google player. Thinking this might be too much for a kindergarten or 1st grade students, I tried Anchor instead.

With Anchor, users only have to click “play.” Plus, recordings are easy to upload and the channel can remain private, so that only our elementary students with the QR codes can access it.

Step Four: Create the QR Codes. For each of recordings on Anchor, we created a QR code (there are lots of QR generators to choose from). We then taped them in the inside covers of the book before returning them to the elementary library.

This was the first year we tried the project, and we truly did figure it out as we went. In the future, I’d recommend creating a class Anchor account and recording directly on Anchor, unless students wanted to edit on Audacity or WeVideo and add background music or special effects. Other than figuring out how to transfer recordings from several types of cell phones, the project was an easy, fun, and rewarding for all of us!

Word Count Challenge

I call it the Blank Page Syndrome. It’s when you have to write something, and you know it will require thinking and work. Even if the topic is something you enjoy–such as me writing blog posts–there’s still that reluctance in the back of your mind. It would be easier to check social media, play another game of ToonBlaster, or find someone to chat with.

Our students have Blank Page Syndrome, too, and who can blame them? In fact, writing is more daunting to some of them. And the longer the assignment or project, the worse it can be.

To help students overcome this first step, we have Word Count Challenges.

On word count challenge days, the goal isn’t to write beautifully; it’s to write prolifically. I start by challenging students to put away their perfectionism–first drafts are about getting words and ideas down, not making each sentence perfect. Also, I encourage them to close any tabs of temptation–social media, email, prom dress e-boutiques–and focus on the task at hand.

Then they write to a goal. Many days, it’s a simple 100 word goal. My mantra is “the first 100 words are the hardest.” Whatever big task we’re working on, the hardest part is getting started. Once we’re going and we’re in Flow (as coined by Mihaly Csikszentmihalyi) then it’s much easier to continue the task.

Sometimes I give other incentives. The other day I exchanged the word count for gold in students’ Classcraft accounts. Each word equaled one gold coin. Other days, I might give a flat amount of XP for reaching a 100 word goal. Or anyone who reaches the goal gets their name entered for a free snackcess card (a punchcard for five pieces of snacks in our class snack box.)

Granted, it’s a bit of external motivation. But what do we do on big projects? We set mini goals, and when we reach those goals, we often reward ourselves. For example, after I comment on five student essays, then I get to play Clash Royale for ten minutes. Or eat a brownie. Or take a walk.

You can also add another step if you want to focus on student goal setting. Have students set their own minigoal for the day. Maybe it’s 50 words. Maybe 200. Or maybe it’s finding five sources.

Doing this teaches our students what most of us already know: The way to eat an elephant is one bite at a time. Hosting a Word Count Challenge is one way to help them with that first bite.

https://fowmedia.com/time-eating-elephant-life/

The Underappreciated Third Space

Whew, I’m back!

I’ve been on hiatus for a few months as I coached our high school speech team. As I do most years, I have the best of intentions to keep posting during this time, but I always underestimate the amount of energy speech season requires (typically leaving me in zombie mode by the time I arrive home).

I’ve also been doing a LOT of reading of research associated with my doctoral program, and every once in a while, something hits me.

Today, it was a big hit; it’s called third space.

This is the hybrid space in the doorframe of your classroom, in the hallway, or on the fringe of your classroom. It’s where you and your students communicate and interact on a more social level before class or before the bell rings. And according to Deborah Bieler, it’s a vitally important (and oft overlooked) opportunity to build relationships with students.

In her book The Power of Talk, Bieler discusses how our interactions with students each push toward attrition or retention of a student. Most of the time, we think about teacher/student communication as a formal exchange during class time or in conferences. However, Bieler points out that the quality of our interactions in third space can be just as essential in building a relationship with a student and ultimately building that student’s desire to stay in school.

There have been years where I’ve tried to teach to the last minute, or keep students working until the last minute. Even two weeks ago, I wondered if I should start reading poems or a book aloud for the last few minutes of class.

These aren’t bad ideas, except that I now realize what the loss would be: spending this third space time with my students.

In my school, the students tend to line up near the door at the end of the period. It’s the only high school I’ve taught at where this happens. Also, it’s a pet peeve of mine.

But lately, I’ve started to use the time to stand there with them. I’ve used the opportunity to strike up conversations–What are you doing this weekend? How’s track practice going? How’s the new car treating you?  And when we have those conversations, we can all relax. We’re not talking about assignments or writing or what we’re doing in class tomorrow. Instead, we’re connecting on a personal level.

No longer will I feel guilt if I don’t start class immediately with the bell because I was busy talking to students, nor will I feel bad if we end up chatting the last few minutes of class. I’m busy building relationships, which is the #1 job any teacher should have.

New Vocab Words? Introduce Them with Narrative!

No teacher would argue the importance of using context clues to understand new vocabulary. What’s harder is how to teach it. One way I’ve approached it is the use of narrative.

Each month, we focus on twelve vocabulary words that are selected from our current texts (the vocab words from the past two months have been from Macbeth–We started studying the words a few weeks before we began reading the play.)

To work on students’ context clues, I write a story that includes all twelve of the words.

But I don’t stop there.

I also include each student’s name within the story, further motivating them to read on. Usually, I add in our principal’s name (who often plays the villain or the token death) or other teachers.

Check out our most recent story, Siren Song!

As students read the story, they write down the vocabulary words (which are bold and underlined), and then try to determine the definitions based on context clues. They also write or draw an example.  All this they do on a strip of cardstock, which we dub our “vocab bookmarks.” After they finish, I look them over and correct any misconceptions.

Finally, they use the bookmarks in their independent reading books for the rest of the month. Students are also allowed to use their bookmarks during our daily challenges (usually a Quizizz or vocab game), and they gradually wean themselves off their bookmarks through the month. They’re also allowed to use the bookmarks on their assessment (which is using the words in writing), though after four weeks of practicing the words, they rarely need them.

How long does it take for me to write a story? About 30-45 minutes. After one story, I make a copy for other sections and change the names. Plus, the stories are then easy to tweak and reuse in following years.

This is an activity that works great on days that you have a substitute or a block of time for independent work. Plus, it’s so much fun watching the kids laugh with each other and search out their own names!

True Crime: A Springboard for Argument Writing

Sarah Koenig and the Serial podcast took the country by storm when they first broadcast the story of Adnan Syed and his alleged murder of his former girlfriend Hae Min Lee. Quickly, I saw teachers on Twitter chat about using the podcast in the classroom–some as a form of literature to analyze, others as a way to meet listening standards.

As for me, I’ve used the case in the past few years as a springboard for argument writing. This year, I also included the Curtis Flowers case, highlighted on season two of In the Dark, as another true crime option for students to analyze and discuss.

The Process

After introducing argumentation with the game Superfight, I introduce the Adnan Syed case in a similar way as Sarah Koenig does in the podcast. I have a Google Form that asks students to give an alibi for three different times, ranging from the previous day to six weeks prior, which is the same amount of time between Lee’s disappearance to the discovery of her body. Always, the students become frustrated with trying to remember where they were, especially when I prohibit the use of their phones or social media (as high school students didn’t have them in 1999). This is an activity that sticks with them throughout the unit, and often I hear students from other classes asking me if they’ll get to do the same unit in the future!

Together, we listen to the first episode. I also provide hard copies of the character map and some primary documents, such as the cell phone records and the Asia McClain letters, so students can peruse these as they listen. We stop occasionally and discuss. Some students take notes. At the end, everyone writes down three questions they want to know more about (this can work really well on a Padlet page, too).

We then move onto the Curtis Flowers’ case. Again, I provide hard copies of evidence, such as a map of the crime scene and the transcripts of the cross-examination of Curtis Flowers, so students may peruse them while they listen.

Once they’ve listened to episode 1 of both cases, they choose one to follow. I give them  3-4 school days to research. Some choose to “divide and conquer” by working as a team to find information and share with each other. Some students choose to work alone.

From there, students plan on a graphic organizer, which I look over to be sure the foundation of their argument is solid. (A sample organizer that’s scaffolded for more struggling students can be seen here). Then, students draft their arguments using both primary and secondary sources. For more details of the unit, you can go here.

Why It Works for Me

  • It’s Real World. Not all students will become lawyers, but many will have to serve on a jury or participate in our legal system. All will have to make voting decisions based on analysis of primary and secondary sources.
  • Mystery. A “Who-done-it” holds a fascination for students. They want to be the one who finds a piece of evidence no one has found or develops a new theory. Even months later, students still stop by to give me updates on the case. They’re still intrigued and following it!
  • Primary Documents. Students have been using secondary resources since they were in the primary grades, but often we don’t emphasize primary sources. With cases like these, students can easily use both primary and secondary sources.
  • Limited Choice. For most writing assignments, I choose the genre and allow my students to choose the topic. For our formal argument research paper, they’re more limited in choice, but they still have the choice of which case to follow. Being limited to the two cases provides for other opportunities. It’s much easier for students to work together and collaborate. During peer review, students are familiar with the cases and can provide deeper feedback about argumentation and counterarguments. The same can be same for me–being familiar with both cases, I can point out misconceptions students have or different angles they may want to consider in argument construction.
  • Applicable for All Levels of Students. I use this unit for both dual credit College Composition and my struggling seniors. Both populations are drawn to the topics and the research. I simply provide more scaffolding and adjust expectations for the second group.

I’ve used this unit with both juniors and seniors, but other teachers have found success with the Serial podcast even with sophomores. Even if a true crime angle isn’t your cup of tea, the resurgence of podcasts provide teachers even more resources to provide to students. With most students owning their own smartphones, it’s so simple for them to listen during long bus rides, driving in their vehicles, or sitting at home–all of these being places that my students said they’d listened to podcasts for this research project.


Assignment Links–Feel free to make a copy!

Unit SlideDeck

CASE 001: Summary of Serial, Episode 1

CASE 002: Summary of case-related article

CASE 003: Works Cited

CASE 005: Writing the Paper

Revision Boards: Letting Students Choose


One of the hardest parts of teaching writing is getting students to revise. For some, completing the rough draft is the milestone. For others, checking spelling and punctuation is what they consider revision.

When I read our latest round of papers, I realized that students needed different types of revision in their papers. Some needed some deeper work, such as adding sources or re-emphasizing the thesis at the beginnings and ends of their main arguments, while others were ready for more stylistic work, such as making wording more concise or strengthening verbs.

To allow students to pursue their own personalized path of revision, I created the revision board. I listed nine different ways that students could revise or edit their papers. Students could choose as many as they wanted (I encouraged them to do at least three; I also mentioned on their papers which revision approaches could be especially helpful to them.

I also gave XP for each block, but I didn’t want students choose blocks based on the XP available–I wanted them to choose the blocks they felt most important to their paper. So we waited until the end of revisions to roll a 10-sided die for each square. Students totaled up their XP, turned in their revision boards, and I added them to Classcraft.

Here’s the link to copy and paste the board (and to see how the rest of our unit is organized).


Our Optional Hour of Code

As an English/Language Arts teacher, I don’t have a lot of coding in my classroom. We do a bit of HTML when we do Choose Your Own Adventure stories on Twine, but that’s it.

This past week, Hour of Code week, I decided to offer an opportunity for interested students. On Classcraft, I made a sidequest for students to complete a set of Angry Birds challenges on Code.Org. 

The sidequest served to be a perfect Friday activity for those done with their regular work for the week. In fact, one of my senior girls enjoyed it so much that she’s considering taking coding next semester.

If you haven’t checked out Code.org, it’s filled with many great coding games like this that are applicable to all ages. Even though my juniors and seniors enjoyed this, my 5th grade son could easily enjoy it just as much. (In addition, even my experienced coders challenged themselves with the complexity of the blocks and routes they made.)

Jigsaw Your Peer Reviews

I’ve tried dozens of ways for students to peer review each other. Analog styles, such as using post-it notes or forms. Digital, online ways using special programs or comments on Google docs.

A year or two ago, I read one of Starr Sackstein’s books, where she described how she jigsawed her peer reviews, where groups focused on one specific area of a paper, such as organization, word choice, or introduction.

After a few rounds, jigsaw peer reviews have soundly become my favorite form of peer review to do with my students. Here’s why I think it works:

  • It’s more kinesthetic. We use hard copies, and it allows readers to feel more connected. That kinesthetic feel can’t be replaced.
  • It’s more social. Starting in groups and comparing ideas, peer feedback becomes a social activity.
  • It’s scaffolded. We start by working in groups and then release to independent work, though conferring with partners is always allowed.
  • It’s less overwhelming. By only focusing on one section or aspect of a paper, students aren’t overwhelmed by longer papers or papers from struggling writers.

Prep:

    1. I print off all the drafts from a Google folder using Mergy to merge them together into one PDF.
    2. I give each student a secret code (like 001, 002, etc.) and write it at the top of the paper. They also use their code later when reviewing. It keeps feedback anonymous. I write the code at the top of each paper in lieu of the writer’s name.
    3. I print the forms for each of my groups (see below) using a different color for each group. For argument papers, as we just finished, my groups are Intros & Conclusions, Section 1, Section 2, and Section 3. (To make the process smoother for students, I also highlight the thesis and draw lines between sections so they’re easy to locate) (For narrative writing, groups might focus on character development, setting, dialogue, and plot structure.)

Introducing Peer Review:

Generally, most students have done forms of peer review when they reach my classroom, so my emphasis is on expectations and the why. First, I reinforce WHY we do this: one, it provides feedback (and this is the obvious reason), but two, I emphasize that they become better writers through this process. They will see how other writers “move” in their papers and start thinking about their own “moves.”

Then, I show them examples of comments that meet and don’t meet expectations (last page of the Google Doc embedded above.)

Round 1 of Peer Review:

I split students into small groups no larger than four students and place each group in charge of one section. I give each group 2-4 papers. Each group member must read their assigned section of EACH paper. Then, the group’s recorder writes on the colored form the feedback that the group has for each paper. (Groups might only have one recorder, or they might take turns).

This takes time if it’s done well. I don’t rush students through this. I want them to discuss these papers, the feedback they want to give, and how to tactfully give that feedback. On average, round 1 takes 20-30 minutes.

After Round 1:

Once the group has carefully discussed and given feedback to all the original papers given to the group, I tell them they can start working independently, completing the colored forms on their own. Of course, they still have their group to confer with if they need ideas or help with their paper.

On the second day (this usually takes us two periods–we don’t have block scheduling), groups read for a different section than they did on the first day. Another alternative is I’ll give each group a few feedback forms of each color. Readers can simply see which sections still need read on that paper based on what colored forms are still missing (readers staple their forms to the papers when finished).

Let me also mention the benefit of using different colors for each section. In one glance, we all know if a paper has feedback for all its sections or which section it’s missing.

What Do I Do During the Process?

I answer questions from readers. I give them feedback ideas if they’re struggling with a paper. I move papers from one group to another. Sometimes I hand specific papers to specific readers because the reader might have a helpful background knowledge about the topic, or maybe the writer needs a “special touch” from a tactful reader. If the writer is in the same room at the same time their paper is being read, I make sure their paper bypasses their group and lands elsewhere.

The Day After Peer Review!

Two things. Obviously, students then receive their own papers back and have feedback from four different readers. They use that feedback to revise their papers (in addition to the comments I’ve also given them–generally, I try to focus on giving students two comments that will most help their paper).

Second, students then vote on their favorite feedback giver. Using a Google form, each student gets to vote on the student code who gave them the most helpful and specific feedback. Those winners are recognized in class and earn extra XP, gold, or something else in our game.

Conclusion

I’ll admit it–this is more work than digital feedback. It takes more planning and  more prep time. The result, however, is the best feedback I’ve seen in all my years of teaching. This system provides more accountability to me and to each other than anything else I’ve used, and writers take their given feedback much more seriously. The 60-90 minutes of prep time is that much time I receive back when I’m reading and evaluating final drafts.


Thankful for the Imperfect

I connect to so much of what Suzy Lolley writes in this blog post. Social media makes other lives seem perfect. I’ve often been guilty of reading teachers’ books or seeing their presentations and thinking, Wow, they’ve got this teaching gig figured out. For a long time, I saw how far I still had to go compared to them.

Slowly, I’ve realized that we all feel this way. None of us feel like we have it figured out. None of us will be perfect teachers. I don’t have to aim for the perfect classroom performance every day. It’s okay to be imperfect.

Read more here:

Social media can really skew our view of ourselves. I don’t know about you, but the more I see people’s perfect families, perfect houses, and perfect lives, it makes me feel like there’s something wrong with me. It can make my gratitude meter run a little low. However, in this month of gratitude, I want to be very intentional to be thankful for the imperfect.

http://suzylolley.com/gratitude-about-the-imperfect/


« Older posts Newer posts »

© 2024 Technology Pursuit

Theme by Anders NorenUp ↑

Skip to toolbar